

Integrate with Zapier - SignRequest - sign an agreement
We use Zapier as an integration platform. The platform uses so-called Zaps to create connections.
A zap has two or more steps where you can choose from triggers, actions and searches.
i-Reserve is an app within the Zapier integration platform that is accessible to everyone.
Usecase
What do we want to achieve? When making a reservation, have the customer sign an agreement.
And have this fully included in the workflow. First sign and, only after signing, send a request for online payment.
Without the need for an employee.
Variations on this usecase can of course be thought of. This usecase provides a number of building blocks with which alternatives can be devised.
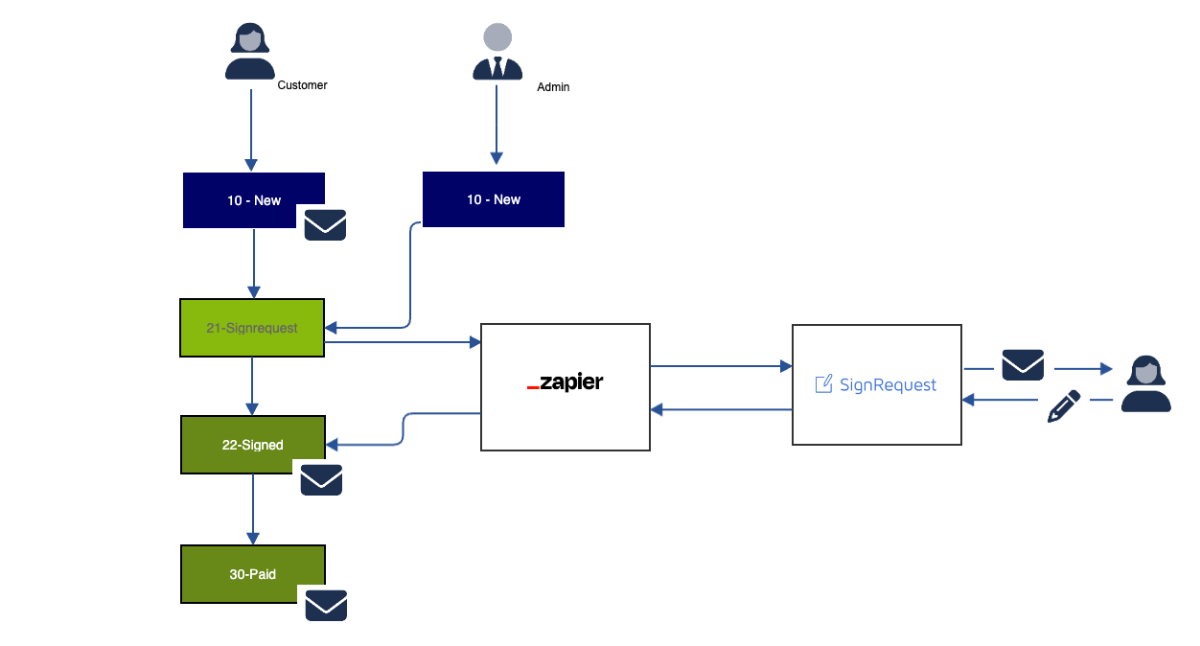
The workflow can be worked out schematically. Steps in the workflow.
- Customer makes a reservation.
- (optional) a reservation confirmation is sent via email
- The reservation is set to 21 via an automatic transition
- The transition triggers a request to Zapier and thus an action to SignRequest
Including the reservation number plus the customer details - A signing request is sent to the customer
- The customer opens the email, opens the request
- The customer signs the agreement
- The signing triggers a request to Zapier and thus an action to i-Reserve
- The transition 21 -> 22 is in progress
- The customer will receive an email with a payment link
- Set up the workflow from here as desired
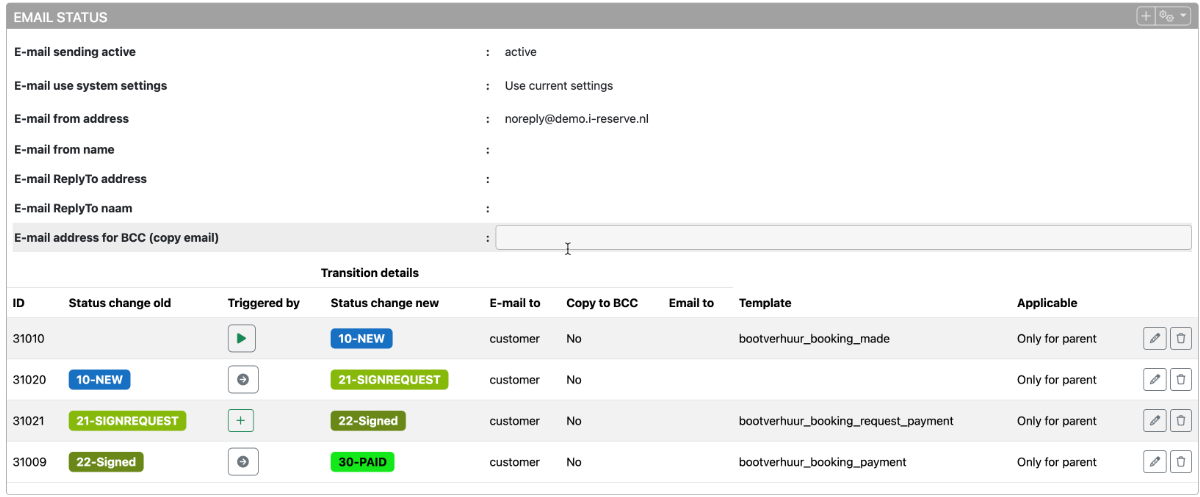
Here we only provide the statuses and emails.
The automation of the steps will run via Zapier.
- Document in PDF or word
- Upload document
- Add fields and signature
- Save template name for next steps
- Trigger is the status change in i-Reserve
- After the trigger comes a filter. In our example we only filter on object and status. This is very situation dependent.
- The filter determines which events are picked up. We add an action from SignRequest.
- The action is "Send SignRequest From template".
- Required: select the correct template
- Required: fill in the customer's email address
- Useful for a follow-up zap: fill in the external ID with the reservation ID
- Useful for the user: fill in the first and last name.
- Trigger is "New document Signed" in SignRequest
- Add a filter, since this trigger also triggers manual signing requests
- We use the External ID field as a filter. After all, if this is filled in, it must come from a previous action. Provided that there are no multiple systems linked
- Add the action "Update booking" to i-Reserve.
- Action has all core fields, such as date and time and quantities. Leave this unchanged!
- It is important to fill the external ID from the trigger in the Booking ID.
- Optional: you could fill in something in the comments field.
- Required for the workflow: a new status. In this example we use 22.
The workflow has now reached the point where it can take further steps.
After all: the reservation has now been signed.
Now a step could be to pay immediately. Then send an email with the payment link.
It could also be that the payment fails. And what then? Maybe reject the reservation or send a reminder?
These are normal choices, which fall outside the scope of this tutorial.
Now that the document has been signed, it would be nice to be able to view it.
Of course, this can be done in SignRequest itself. An email will also be sent with the document.
But wouldn't it be nice if you could view the document directly in i-Reserve?
We are going to adjust the return Zap.
- Put the Zap "agreement signed" in edit mode
- Add an action: "Create document"
- Choose the same connection as the previous action
- Required field: entity_id: enter the External ID from SignRequest here
- Required field: enter "booking" here.
- Required field: enter "Signed PDF file" here. This is a link that is temporarily available to download the document.
- Publish the Zap
Now that we have completed all the steps, we can start testing.
Just look at the result!


