

Setting up access with SaltoKS
SALTO KS Integration Manual – Administrator
This manual describes step-by-step how to:
- Set up authentication
- Link objects (mapping)
- Configure correctly
- Troubleshoot
Prerequisites
- You have a SaltoKS username and credentials
- An IQ is active in the environment
- One or more locks are linked to the IQ
- You know your SiteID
1.1 Environment
Choose the correct environment:
-
Acceptance → test environment
-
Production → live environment
Use acceptance for testing. Only convert to production when everything is working correctly.
1.2 Site ID
This is the unique identifier for your SALTO site.
You will receive this value from SALTO KS.
Check:
-
That the UID matches the correct site
-
That you are working in the correct environment (acceptance vs. production)
1.3 Site ID (UUID)
Click on "Retrieve and save Site ID".
The system will now automatically retrieve the correct UUID from SALTO.
Check:
-
No UUID is being filled in? → Check Client ID / Client Secret
-
Are you getting an error message? → Check permissions in SALTO
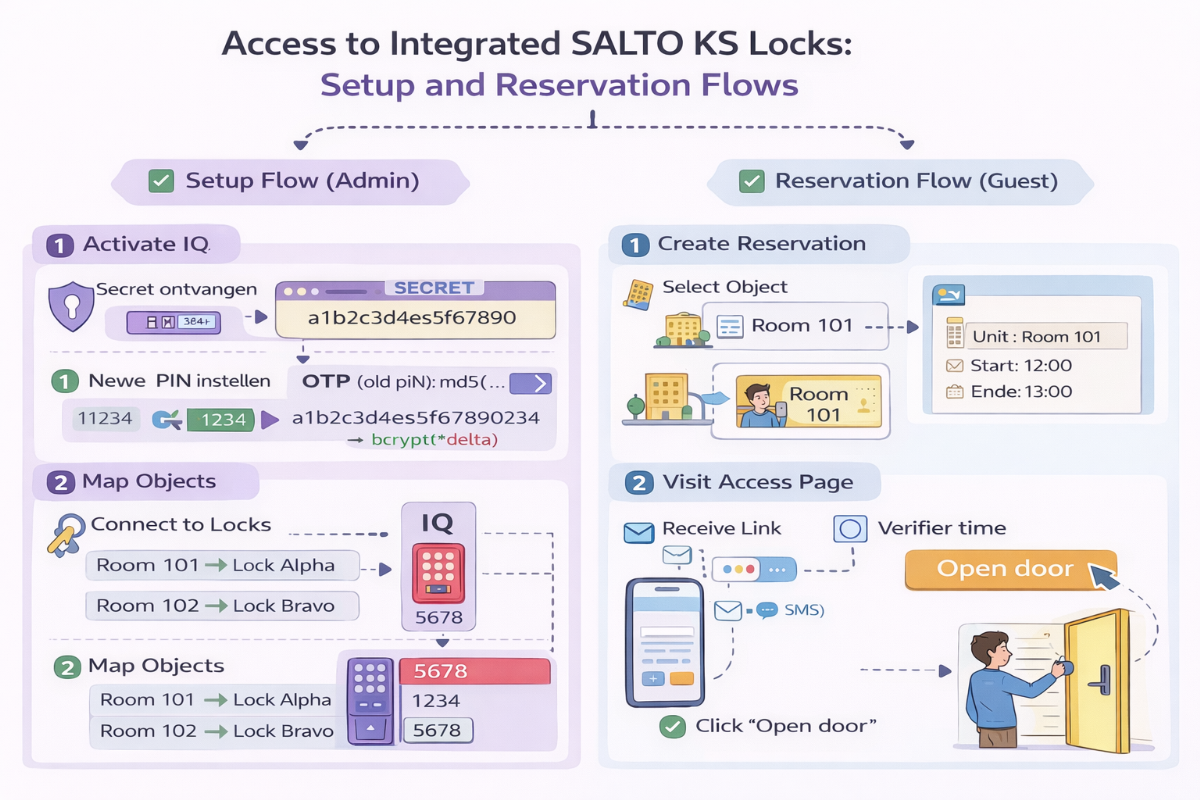
1.4 IQ OTP Setup
Target status: IQ is activated
This means that:
-
The IQ controller is correctly paired
-
OTP functionality is active
Is this not active?
-
This is the starting status of an IQ.
-
Retrieve the PIN code with GET PIN
-
Enter the PIN code in the current PIN box
-
Enter a new PIN Save this code.
-
Save this. From now on, the IQ is secured with this PIN code.
1.5 KS Username and Password
These are the SALTO KS account details.
Note:
-
Use a service account
-
Do not use a personal email address
-
Ensure this account has administrative rights on the site
1.6 Client ID and Client Secret
These are generated in the SALTO KS developer portal.
Checkpoints:
-
Copied correctly (no spaces)
-
Correct environment (acceptance ≠ production)
-
Not expired
1.7 Test Access Request
Click on “Test Access Request”.
Expected result:
-
No error message
-
Successful response from SALTO
If error:
-
401 → incorrect client credentials
-
403 → insufficient permissions
-
Timeout → Network/firewall problem
-
Purpose: Link an i-Reserve object (e.g., Room 101) to a SALTO lock.
Go to:
Configuration → SALTO Mapping
2.1 What's happening here?
i-Reserve works with:
-
Objects (e.g., Room 101, Meeting Room A)
SALTO works with:
-
Locks
You must:
Object → Link Lock
2.2 How to link Objects?
Step 1:
Select an i-Reserve object.
Step 2:
Choose the correct SALTO lock from the list.
Step 3:
Save.
Example:
-
Room 101 → Lock Alpha
-
Room 102 → Lock Bravo
2.3 What should you pay attention to?
-
One object can only be linked to one lock
-
Check that the correct physical lock is selected
-
Incorrectly pairing the wrong door opens
2.4 What happens technically?
With a reservation:
-
i-Reserve looks at the object
-
Finds the paired lock
-
Directs access to that specific SALTO lock
Without mapping, access will not work.
Here you determine the system behavior.
3.1 Lock may open based on status
Here you select the reservation status at which the door may be opened.
Example:
-
Confirmed
-
Paid
-
Checked in
Important:
If the status is not selected, the user cannot open the door.
Advice:
Allow opening only when:
-
Paid
-
Or definitively confirmed
3.2 Time before (in minutes)
This determines how many minutes before the start time access becomes active.
Example:
1440 minutes = 24 hours of access in advance.
Use this wisely:
-
Hotel → 30 to 60 minutes
-
Sports facility → 15 minutes
-
Self-check-in model → possibly longer
Set too high = risk of early access.
3.3 Save last open action in field
Here you choose the reservation field in which the last The open action is saved.
For example:
“Reservation changed 01”
Why is it important?
-
Logging
-
Audit trail
-
Support analysis
3.4 Status after opening a slot (check-in)
When opening a slot, a reservation status can be automatically changed.
For example:
After opening → status becomes “23-LOCKOPOPEN”
Use this for:
-
Automatic check-in
-
Registration of Attendance
-
No-show discount
Note:
If this is incorrect, a reservation's status may unintentionally change.
Below are the most common problems.
Problem 1: Door won't open
Check:
-
Is the reservation in the correct status?
-
Is the object mapped correctly?
-
Is the user within the allowed time window?
-
Has payment been completed?
-
Is there an active internet connection on site?
Problem 2: No email or SMS received
Check:
-
Is communication activated?
-
Is the email address/phone number correct?
-
Has the reservation been confirmed?
-
Is the door status set correctly?
Problem 3: Error during access request test
401 → incorrect client ID/secret
403 → insufficient permissions
Timeout → firewall or network
Also check:
-
Is the environment set correctly?
-
Are the Site UID and UUID correct?
Problem 4: Wrong door opens
Cause:
Incorrect mapping.
Solution:
-
Check object → lock link
-
Correct mapping
-
Retest
Problem 5: Access too early or too late
Check:
-
"Time before (in minutes)"
-
Reservation start and end times
-
Time zone settings


